Hi everyone! How are you? In this blog we are going to see exercises to learn the Circular Breathing Technique step by step. I hope it helps you!
The materials needed will be a glass of water, a straw and our wind musical instrument.
What is circular breathing and what is it for?
The circular breathing is the ability of breathing out while we breathe in at the same time. The first thing we normally think at the beginning of the process is that it is humanly impossible. And actually … it is impossible! The trick is that we are not doing both parts of the process at exactly the same time.
We have muscles in our cheeks that are able to work independently from the ordinary breathing mechanism!! Cheeks muscles allow us to keep air in our mouth and breath out using them.
We need to push the air out from our mouth as we are breathing in through our nose. We will see the process in detail afterwards.
Now we are going to understand how it works following a few steps:
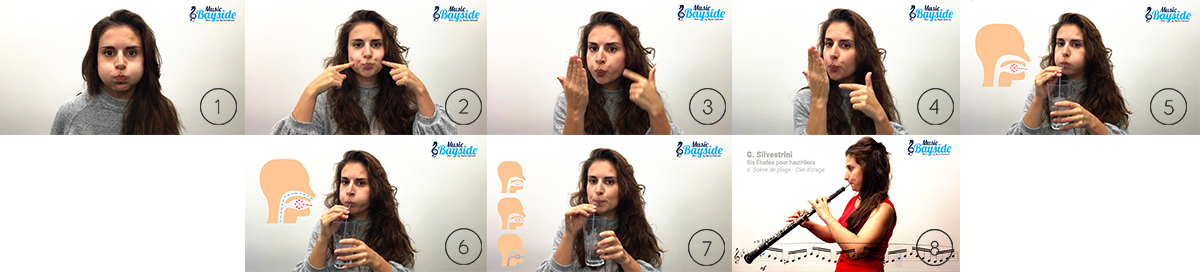
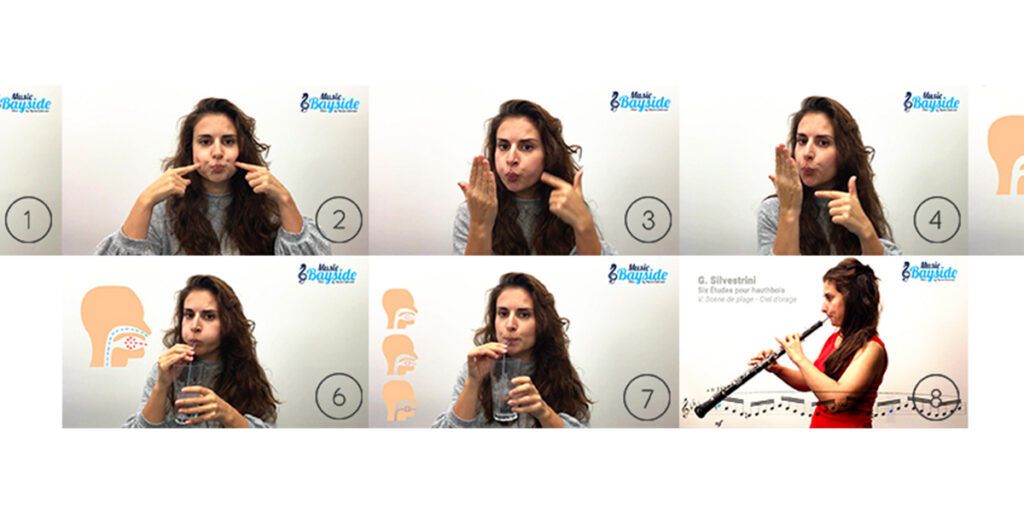
Step 1: Hold air in your cheeks while you breathe normally through your nose.
Step 2: Push the air out from your mouth using your fingers. Attention: Use only the air that is kept in your mouth!
Step 3: Push the air in silence and breath in at the same time. It may help if you put your hand just in front of your mouth so that way it’s possible to feel the air coming out.
Step 4: Push the air from your mouth and breath in through your nose to refill the air inside your mouth again. Try to use the muscles in your face and your chin to help the air come into your mouth and fill the space in. Think in a vertical-horizontal movement of the low part of your head.
Step 5: Take a glass of water and a straw. We will make bubbles with the air kept in our mouth.
Step 6: Keep the bubbles steady while you breath in again and keep some of that air in your mouth. It’s possible to pinch the straw a little bit so you can feel some resistance as the instrument does itself.
Step 7: Repeat as many times as you want but at least for two weeks before taking your instrument.
Step 8: Take your instrument and apply the entire process.
The first time the sound will be emitted with cuts. Probably you are doing too much pressure in your embouchure. Try to use an easy reed and relax!
Afterwards what would happen is that the sound would tremble while you breath in. That’s because there is a lack of pressure in the column air. We need to equilibrate the diaphragmatic pressure with the pressure inside our mouth.
I would suggest to practice this technique with scales or trills at the very beginning. To apply this technique in a long note is the hardest part of it so better we will keep that for later on.
Afterwards just practice, practice and practice.
Normally it takes a few months of practice so be patient. Once you get it you will have it forever.
Leave in the comments here below your advice for studying this technique. Don’t forget to share all your photos and videos of the process in Facebook, Twitter and Instagram with the hashtags #musicbaysideoboe #musicbaysideblog and #oboe
If you want to see the full video about the Circular Breathing Technique, you can find it below: